Part 1: Contextual, Attested, and Decentralized Authentication (CADA) for AI MCP Agents

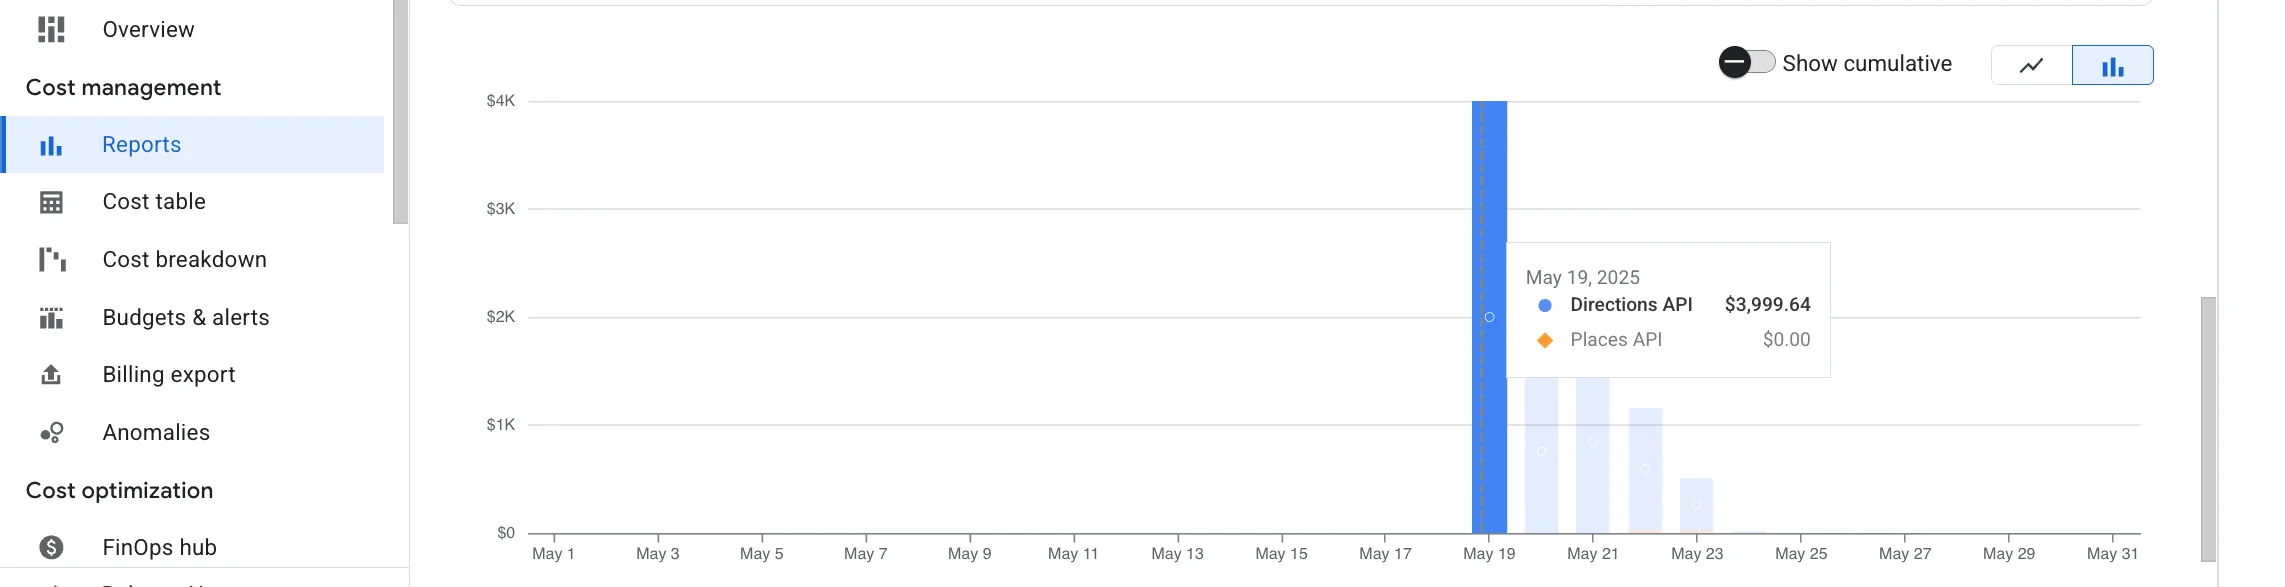
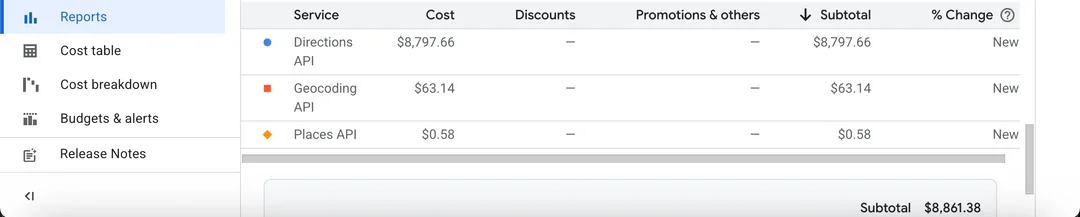
Look, the old ways of auth weren’t built for what’s coming. AI agents don’t live in static sessions or predictable flows—they’re ephemeral, reactive, scattered across clouds, and making decisions faster than your token TTL. So why are we still handing them bearer tokens like it’s 2012? Nothing should be permanent. Context matters. What the agent is doing right now should influence what it’s allowed to do right now. That means proof tied to the moment, not to some long-lived credential you forgot to revoke. It should be rooted in hardware—attested, unforgeable, impossible to rip out and reuse. And above all, it should be decentralized. No single gatekeeper. No single failure point. Trust should move with the agent, like a shadow—provable, portable, disposable. Authentication needs to evolve, or it’ll just be another thing the agents bypass.

As AI MCP agents evolve into autonomous, multi-tenant actors operating across data planes, trust boundaries, and compute contexts, traditional token-based frameworks like OAuth 2.0 fail to provide the necessary granularity, context-awareness, and runtime verification. CADA introduces a new model for zero-standing privilege, context-aware identity, and attestation-driven trust, leveraging confidential computing and decentralized identity primitives.


Core Pillars

  1. Decentralized Identity Anchors (DID-A)
    • Each MCP agent is assigned a Decentralized Identifier (DID) backed by a verifiable credential (VC).
    • The identity is not centrally registered but anchored in a distributed ledger or verifiable key infrastructure (e.g., SIDetree, Sovrin, or ION).
    • DIDs resolve to metadata including key rotation history, policies, and agent type (exploratory, monitoring, remediation, etc.).
  2. Context-Bound Proof-of-Presence Tokens (CB-PoP)
    • Instead of bearer tokens, agents use signed ephemeral tokens with embedded context:
      • Temporal window (e.g., within the last 30s)
      • Location constraints (verified via confidential enclave attestation)
      • Input/output scope (model state hashes, data fingerprinting)
    • These are validated by services with confidential computing backends using Intel SGX/AMD SEV or AWS Nitro Enclaves.
  3. FIDO2 + TPM/TEE Hardware Anchoring
    • Each agent’s execution environment binds its private signing key to a hardware root of trust, such as TPM or TEE.
    • Authentication occurs via WebAuthn-style challenges, signed inside a secure enclave, with attestation reports validating runtime integrity.
    • Eliminates key export risk and enables remote trust of agent execution context.
  4. Dynamic Trust Contracts (DTC)
    • Each authenticated interaction is governed by a smart contract defining:
      • Data access policies
      • Audit/tracing rules
      • Time-limited execution permissions
      • Revocation semantics based on real-time observability inputs
    • These contracts are cryptographically signed by the MCP owner and verified prior to execution.
  5. Zero Standing Privilege with Just-In-Time Delegation
    • Agents do not persist access tokens.
    • Authorization is granted at runtime through delegated trust, using time-bound, task-specific credentials derived from identity and context proof.

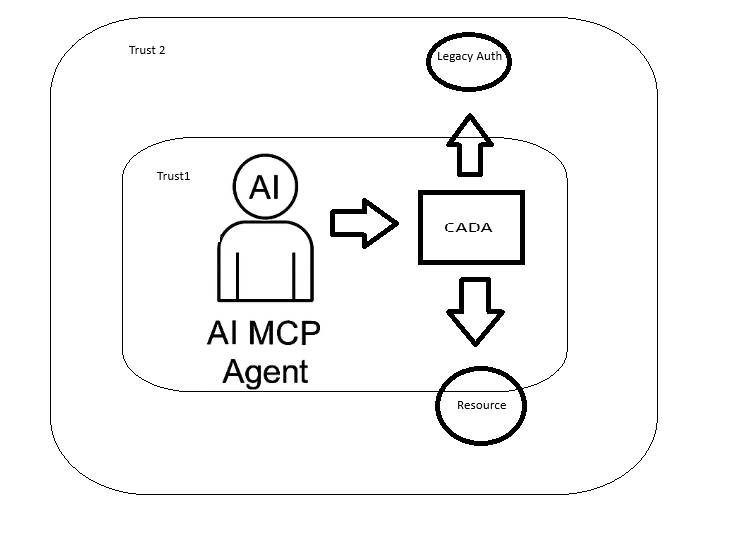
Authentication Flow Example

  1. Agent Bootstraps Identity
    • Generates ephemeral DID linked to owner’s permanent identity
    • Signs its public key using its hardware-anchored root
  2. Agent Requests Access to Service
    • Prepares CB-PoP: signs request metadata, timestamps, hash of recent model inputs, and enclave measurement
    • Attaches DID and enclave attestation proof
  3. Service Validates Request
    • Resolves DID and verifies VC chain
    • Confirms enclave integrity and CB-PoP freshness
    • Checks smart contract for permission rules
  4. Access Granted
    • Service encrypts data with agent’s public key (ensuring only that enclave can decrypt)
    • Transaction is logged immutably with context metadata

Why It’s Better than OAuth

FeatureOAuth 2.0CADA
Agent IdentityStatic Client IDDynamic, Decentralized DID
Trust ModelPredefined ScopesRuntime Context + Attestation
Token SecurityBearerEphemeral, Context-bound, Non-exportable
Privilege ModelLong-lived AccessZero-standing Privilege
RevocationManual / OpaqueSmart Contracts, Observable Context


I started to write some stuff last night in Rust, I'll get this up in Github in the next few days.

Generate a Decentralized Identity (DID)


use ssi::did::DIDMethod;
use ssi::did_resolve::DIDResolver;
use ssi::jwk::{JWK, Params as JWKParams};
use ssi::vc::URI;

fn generate_did() -> Result<(), Box<dyn std::error::Error>> {
    let jwk = JWK {
        params: JWKParams::OKP(ssi::jwk::OctetParams {
            curve: "Ed25519".to_string(),
            public_key: vec![],
            private_key: Some(vec![]), // Generate ephemeral keypair
        }),
        ..Default::default()
    };

    let did = ssi::did::did_key::DIDKey.generate(&jwk)?;
    println!("Generated DID: {}", did);
    Ok(())
}

Bind Key to Hardware (e.g. TPM or Nitro Enclave)


use tss_esapi::Context;
use tss_esapi::structures::{Auth, Public};

fn generate_tpm_bound_key() -> Result<(), Box<dyn std::error::Error>> {
    let mut context = Context::new(Default::default())?;
    let key_auth = Auth::try_from(vec![0u8; 32])?;

    let public = Public::rsa_encrypt_decrypt_key(/* your key parameters here */);
    let (key_handle, _) = context.create_primary(public, key_auth)?;
    println!("Key generated and bound to TPM context.");
    Ok(())
}

Create a Context-Bound Proof Token (CB-PoP)
use chrono::Utc;
use ring::signature::{Ed25519KeyPair, KeyPair};
use serde_json::json;

fn create_cb_pop(agent_id: &str, model_digest: &str, enclave_measurement: &str) -> String {
    let now = Utc::now().timestamp();

    let token = json!({
        "agent_id": agent_id,
        "timestamp": now,
        "context": {
            "model_state_hash": model_digest,
            "enclave": enclave_measurement
        }
    });

    // Sign it using an ephemeral keypair inside enclave or bound to TPM
    let keypair = Ed25519KeyPair::from_pkcs8(&get_private_key_bytes()).unwrap();
    let signature = keypair.sign(token.to_string().as_bytes());

    json!({
        "token": token,
        "signature": base64::encode(signature.as_ref())
    }).to_string()
}
Smart Contract

use ethers::prelude::*;
use std::sync::Arc;

#[tokio::main]
async fn validate_contract_permission(agent_id: String) -> Result<(), Box<dyn std::error::Error>> {
    let provider = Provider::<Http>::try_from("https://mainnet.infura.io/v3/YOUR_PROJECT_ID")?;
    let client = Arc::new(SignerMiddleware::new(provider, Wallet::from(...)));

    let contract = Contract::new("0xYourContractAddress", contract_abi, client);
    let is_allowed: bool = contract.method::<_, bool>("isAuthorized", agent_id)?.call().await?;
    println!("Access allowed: {}", is_allowed);
    Ok(())
}

Implementing OAuth with an MCP (Model Context Protocol) AI Test Server: A Technical Deep Dive

I wasn’t really sure I even wanted to write this up — mostly because there are some limitations in MCP that make things a little… awkward. But I figured someone else is going to hit the same wall eventually, so here we are.

If you’re trying to use OAuth 2.0 with MCP, there’s something you should know: it doesn’t support the full OAuth framework. Not even close.

MCP only works with the default well-known endpoints:

  • /.well-known/openid-configuration
  • /.well-known/oauth-authorization-server

Before we get going, let me write this in the biggest and most awkward text I can find.

Run the Device Flow outside of MCP, then inject the token into the session manually.

And those have to be hosted at the default paths, on the same domain as the issuer. If you’re using split domains, custom paths, or a setup where your metadata lives somewhere else (which is super common in enterprise environments)… tough luck. There’s no way to override the discovery URL.

It also doesn’t support other flows like device_code, jwt_bearer, or anything that might require pluggable negotiation. You’re basically stuck with the default authorization code flow, and even that assumes everything is laid out exactly the way it expects.

So yeah — if you’re planning to hook MCP into a real-world OAuth deployment, just be aware of what you’re signing up for. I wish this part of the protocol were a little more flexible, but for now, it’s pretty locked down.

Model Context Protocol (MCP) is an emerging standard for AI model interaction that provides a unified interface for working with various AI models. When implementing OAuth with an MCP test server, we’re dealing with a specialized scenario where authentication and authorization must accommodate both human users and AI agents.

This technical guide covers the implementation of OAuth 2.0 in an MCP environment, focusing on the unique requirements of AI model authentication, token exchange patterns, and security considerations specific to AI workflows.

Prerequisites

Before implementing OAuth with your MCP test server:

  1. MCP Server Setup: A running MCP test server (v0.4.0 or later)
  2. Developer Credentials: Client ID and secret from the MCP developer portal
  3. OpenSSL: For generating key pairs and testing JWT signatures
  4. Understanding of MCP’s Auth Requirements: Familiarity with MCP’s auth extensions for AI contexts

Section 1: MCP-Specific OAuth Configuration

1.1 Registering Your Application

MCP extends standard OAuth with AI-specific parameters:

curl -X POST https://auth.modelcontextprotocol.io/register \
  -H "Content-Type: application/json" \
  -d '{
    "client_name": "Your AI Agent",
    "client_type": "ai_service",  # MCP-specific client type
    "grant_types": ["authorization_code", "client_credentials"],
    "redirect_uris": ["https://your-domain.com/auth/callback"],
    "scopes": ["mc:inference", "mc:fine_tuning"],  # MCP-specific scopes
    "ai_metadata": {  # MCP extension
      "model_family": "your-model-family",
      "capabilities": ["text-generation", "embeddings"]
    }
  }'

1.2 Understanding MCP’s Auth Flows

MCP supports three primary OAuth flows:

  1. Standard Authorization Code Flow: For human users interacting with MCP via UI
  2. Client Credentials Flow: For server-to-server AI service authentication (sucks, doesn’t work, even the work arounds, don’t do it)
  3. Device Flow: For headless AI environments

Section 2: Implementing Authorization Code Flow

2.1 Building the Authorization URL

MCP extends standard OAuth parameters with AI context:

from urllib.parse import urlencode

auth_params = {
    'response_type': 'code',
    'client_id': 'your_client_id',
    'redirect_uri': 'https://your-domain.com/auth/callback',
    'scope': 'openid mc:inference mc:models:read',
    'state': 'anti-csrf-token',
    'mcp_context': json.dumps({  # MCP-specific context
        'model_session_id': 'current-session-uuid',
        'intended_use': 'interactive_chat'
    }),
    'nonce': 'crypto-random-string'
}

auth_url = f"https://auth.modelcontextprotocol.io/authorize?{urlencode(auth_params)}"

2.2 Handling the Callback

The MCP authorization server will return additional AI context in the callback:

@app.route('/auth/callback')
def callback():
    auth_code = request.args.get('code')
    mcp_context = json.loads(request.args.get('mcp_context', '{}'))  # MCP extension

    token_response = requests.post(
        'https://auth.modelcontextprotocol.io/token',
        data={
            'grant_type': 'authorization_code',
            'code': auth_code,
            'redirect_uri': 'https://your-domain.com/auth/callback',
            'client_id': 'your_client_id',
            'client_secret': 'your_client_secret',
            'mcp_context': request.args.get('mcp_context')  # Pass context back
        }
    )

    # MCP tokens include AI-specific claims
    id_token = jwt.decode(token_response.json()['id_token'], verify=False)
    print(f"Model Session ID: {id_token['mcp_session_id']}")
    print(f"Allowed Model Operations: {id_token['mcp_scopes']}")

Section 3: Client Credentials Flow for AI Services

3.1 Requesting Machine-to-Machine Tokens

import requests

response = requests.post(
    'https://auth.modelcontextprotocol.io/token',
    data={
        'grant_type': 'client_credentials',
        'client_id': 'your_client_id',
        'client_secret': 'your_client_secret',
        'scope': 'mc:batch_inference mc:models:write',
        'mcp_assertion': generate_mcp_assertion_jwt()  # MCP requirement
    },
    headers={'Content-Type': 'application/x-www-form-urlencoded'}
)

token_data = response.json()
# MCP includes additional AI context in the response
model_context = token_data.get('mcp_model_context', {})

3.2 Generating MCP Assertion JWTs

MCP requires a signed JWT assertion for client credentials flow:

import jwt
import datetime

def generate_mcp_assertion_jwt():
    now = datetime.datetime.utcnow()
    payload = {
        'iss': 'your_client_id',
        'sub': 'your_client_id',
        'aud': 'https://auth.modelcontextprotocol.io/token',
        'iat': now,
        'exp': now + datetime.timedelta(minutes=5),
        'mcp_metadata': {  # MCP-specific claims
            'model_version': '1.2.0',
            'deployment_env': 'test',
            'requested_capabilities': ['inference', 'training']
        }
    }

    with open('private_key.pem', 'r') as key_file:
        private_key = key_file.read()

    return jwt.encode(payload, private_key, algorithm='RS256')

Section 4: MCP Token Validation

4.1 Validating ID Tokens

MCP ID tokens include standard OIDC claims plus MCP extensions:

from jwt import PyJWKClient
from jwt.exceptions import InvalidTokenError

def validate_mcp_id_token(id_token):
    jwks_client = PyJWKClient('https://auth.modelcontextprotocol.io/.well-known/jwks.json')

    try:
        signing_key = jwks_client.get_signing_key_from_jwt(id_token)
        decoded = jwt.decode(
            id_token,
            signing_key.key,
            algorithms=['RS256'],
            audience='your_client_id',
            issuer='https://auth.modelcontextprotocol.io'
        )

        # Validate MCP-specific claims
        if not decoded.get('mcp_session_id'):
            raise InvalidTokenError("Missing MCP session ID")

        return decoded
    except Exception as e:
        raise InvalidTokenError(f"Token validation failed: {str(e)}")

4.2 Handling MCP Token Introspection

def introspect_mcp_token(token):
    response = requests.post(
        'https://auth.modelcontextprotocol.io/token/introspect',
        data={
            'token': token,
            'client_id': 'your_client_id',
            'client_secret': 'your_client_secret'
        }
    )

    introspection = response.json()
    if not introspection['active']:
        raise Exception("Token is not active")

    # Check MCP-specific introspection fields
    if 'mc:inference' not in introspection['scope'].split():
        raise Exception("Missing required inference scope")

    return introspection

Section 5: MCP-Specific Considerations

5.1 Handling Model Session Context

MCP tokens include session context that must be propagated:

def call_mcp_api(endpoint, access_token):
    headers = {
        'Authorization': f'Bearer {access_token}',
        'X-MCP-Context': json.dumps({
            'session_continuity': True,
            'model_temperature': 0.7,
            'max_tokens': 2048
        })
    }

    response = requests.post(
        f'https://api.modelcontextprotocol.io/{endpoint}',
        headers=headers,
        json={'prompt': 'Your AI input here'}
    )

    return response.json()

5.2 Token Refresh with MCP Context

def refresh_mcp_token(refresh_token, mcp_context):
    response = requests.post(
        'https://auth.modelcontextprotocol.io/token',
        data={
            'grant_type': 'refresh_token',
            'refresh_token': refresh_token,
            'client_id': 'your_client_id',
            'client_secret': 'your_client_secret',
            'mcp_context': json.dumps(mcp_context)
        }
    )

    if response.status_code != 200:
        raise Exception(f"Refresh failed: {response.text}")

    return response.json()

Section 6: Testing and Debugging

6.1 Using MCP’s Test Token Endpoint

curl -X POST https://test-auth.modelcontextprotocol.io/token \
  -H "Content-Type: application/x-www-form-urlencoded" \
  -d "grant_type=client_credentials" \
  -d "client_id=test_client" \
  -d "client_secret=test_secret" \
  -d "scope=mc:test_all" \
  -d "mcp_test_mode=true" \
  -d "mcp_override_context={\"bypass_limits\":true}"

6.2 Analyzing MCP Auth Traces

Enable MCP debug headers:

headers = {
    'Authorization': 'Bearer test_token',
    'X-MCP-Debug': 'true',
    'X-MCP-Traceparent': '00-0af7651916cd43dd8448eb211c80319c-b7ad6b7169203331-01'
}

Why did this suck so much?

Implementing OAuth with an MCP test server requires attention to MCP’s AI-specific extensions while following standard OAuth 2.0 patterns. Key takeaways:

  1. Always include MCP context parameters in auth flows
  2. Validate MCP-specific claims in tokens
  3. Propagate session context through API calls
  4. Leverage MCP’s test endpoints during development

For production deployments, ensure you:

  • Rotate keys and secrets regularly
  • Monitor token usage patterns
  • Implement proper scope validation
  • Handle MCP session expiration gracefully

Linux Kernel 6.1.6 rc3

What’s new? Oh, just your usual dose of 1,000+ micro-patches, mysterious scheduler “optimizations,” and a whole bunch of drivers you didn’t know your toaster needed.

The changelog reads like a novel written by a caffeinated robot: fixes for AMD, tweaks for Intel, a gentle pat on the back for ARM, and a completely normal update to BPF that definitely won’t break your debug setup (again).

Should you upgrade? Of course.

Kernel Hell: SLUB Allocator Contention on NUMA Machines

So here’s a weird rabbit hole I went down recently: trying to figure out why Linux memory allocation slows to a crawl under pressure — especially on big multi-socket systems with a ton of cores. The culprit? Good ol’ SLUB. And no, I don’t mean a rude insult — I mean the SLUB allocator, one of the core memory allocators in the Linux kernel.

If you’ve ever profiled a high-core-count server under load and seen strange latency spikes in malloc-heavy workloads, there’s a good chance SLUB contention is part of it.

The Setup

Let’s say you’ve got a 96-core AMD EPYC box. It’s running a real-time app that’s creating and destroying small kernel objects like crazy — maybe TCP connections, inodes, structs for netlink, whatever.

Now, SLUB is supposed to be fast. It uses per-CPU caches so that you don’t have to lock stuff most of the time. Allocating memory should be a lockless, per-CPU bump pointer. Great, right?

Until it’s not.

The Problem: The Slow Path of Doom

When the per-CPU cache runs dry (e.g., under memory pressure or fragmentation), you fall into the slow path, and that’s where things get bad:

  • SLUB hits a global or per-node lock (slub_lock) to refill the cache.
  • If your NUMA node is short on memory, it might fallback to a remote node — so now you’ve got cross-node memory traffic.
  • Meanwhile, other cores are trying to do the same thing. Boom: contention.
  • Add slab merging and debug options like slub_debug into the mix, and now you’re in full kernel chaos mode.

If you’re really unlucky, your allocator calls will stall behind a memory compaction or even trigger the OOM killer if it can’t reclaim fast enough.

Why This Is So Hard

This isn’t just “optimize your code” kind of stuff — this is deep down in mm/slub.c, where you’re juggling:

  • Atomic operations in interrupt contexts
  • Per-CPU vs. global data structures
  • Memory locality vs. system-wide reclaim
  • The fact that one wrong lock sequence and you deadlock the kernel

There are tuning knobs (/proc/slabinfo, slub_debug, etc.), but they’re like trying to steer a cruise ship with a canoe paddle. You might see symptoms, but fixing the cause takes patching and testing on bare metal.

Things I’m Exploring

Just for fun (and pain), I’ve been poking around the idea of:

  • Introducing NUMA-aware slab refill batching, so we reduce cross-node fallout.
  • Using BPF to trace slab allocation bottlenecks live (if you haven’t tried this yet, it’s surprisingly helpful).
  • Adding a kind of per-node, per-type draining system where compaction and slab freeing can happen more asynchronously.

Not gonna lie — some of this stuff is hard. It’s race-condition-central, and the kind of thing where adding one optimization breaks five other things in edge cases you didn’t know existed.

SLUB is amazing when it works. But when it doesn’t — especially under weird multi-core, NUMA, low-memory edge cases — it can absolutely wreck your performance.

And like most things in the kernel, the answer isn’t always “fix it” — sometimes it’s “understand what it’s doing and work around it.” Until someone smarter than me upstreams a real solution.

I Don’t Want Your Kernel-Level Anti-Cheat. I Want to Play My Damn Game.

Let me be crystal clear: I hate kernel-level anti-cheat.

I’m not talking about a mild dislike, or a passing irritation. I mean deep, primal, disgust. The kind you feel when you realize the thing you paid for—your game, your entertainment, your free time—comes with a side of invasive rootkit-level surveillance masquerading as “protection.”

You call it BattlEye, Vanguard, Xigncode, whatever the hell you want. I call it corporate spyware with a EULA.

It’s MY Computer, Not Yours

Let’s get this straight: no anti-cheat—none—has any damn business installing itself at the kernel level, the most privileged layer of my operating system. You know who else runs code in the kernel?

Rootkits. Malware. Nation-state surveillance tools.

So, no, I don’t want your “proactive protection system” watching every process I launch, analyzing memory usage, intercepting system calls, and God-knows-what-else while I try to enjoy a couple hours of gaming. That’s not anti-cheat. That’s anti-user.

“But It’s Necessary to Stop Cheaters!”

Don’t feed me that line. You mean to tell me the only way to stop some 14-year-old aimbotting in Call of Duty: Disco Warfare 7 is to give you full access to the innermost sanctum of my machine? Are you serious?

There’s a difference between anti-cheat and carte blanche to run black-box software with system-level privileges. If your defense against wallhacks requires administrator rights on MY computer 24/7, your design is broken.

Cheaters are clever, sure. But so are malware authors. You know what they do? Exploit over-privileged software running in the kernel. You’ve just handed them one more juicy target.

I Didn’t Sign Up to Beta Test Your Surveillance System

Let’s talk about transparency. There isn’t any.

What does your anti-cheat actually do? What telemetry does it collect? What heuristics are used to flag me? Does it store that data? Share it? Sell it? Run in the background when I’m not even playing?

You won’t tell me. You’ve locked it up tighter than Fort Knox and buried it in an NDA-laced support email chain.

And don’t even get me started on false positives. I’ve seen legit players banned for running Discord overlays or having a debugger open from their job. Their appeals? Ignored. Labeled cheaters by automated judgment, with no accountability.

The Irony? You Still Don’t Stop Cheaters

And here’s the kicker. You’re still losing.

Despite all this Big Brother garbage, cheaters still infest games. ESPs, ragebots, HWID spoofers—they’re thriving. Know why?

Because you’re fighting a cat-and-mouse game with people who are smarter, faster, and more motivated than your overfunded security team. You’re just screwing over everyone else in the process.

Enough

I don’t want a rootkit with my copy of Rainbow Six. I don’t want a watchdog in the kernel just to enjoy Escape from Tarkov. I don’t want to sacrifice privacy, performance, or basic control over my system for the privilege of not being called a cheater.

You say your mission is to “keep the game clean.”

I say: start by getting out of my goddamn kernel.

Using PyTorch to Investigate Catastrophic Forgetting in Continual Learning

I’ve been working on this for awhile. I want to start writing more about Pytorch. One topic that has been taking a lot of my reading time these days is catastrophic forgetting. Lets dive into it. Catastrophic forgetting is a well-documented failure mode in artificial neural networks where previously learned knowledge is rapidly overwritten when a model is trained on new tasks. This phenomenon presents a major obstacle for systems intended to perform continual or lifelong learning. While human learning appears to consolidate past experiences in ways that allow for incremental acquisition of new knowledge (a huge fucking maybe here btw, in fact, a lot of this is a deep maybe), deep learning systems—especially those trained using stochastic gradient descent—lack native mechanisms for preserving older knowledge. In this article, we explore how PyTorch can be used to simulate and mitigate this effect using a controlled experiment involving disjoint classification tasks and a technique called Elastic Weight Consolidation (EWC).

Why do you care? Recently at work, my boss had to explain in detail how my company makes sure that there is no data left if processing nodes are reused. That really got me thinking about this…

We construct a continual learning environment using MNIST by creating two disjoint tasks: one involving classification of digits 0 through 4 and another involving digits 5 through 9. The dataset is filtered using torchvision utilities to extract samples corresponding to each task. A shared multilayer perceptron model is defined in PyTorch using two fully connected hidden layers followed by a single classification head, allowing us to isolate the effects of sequential training on a common representation space. The model is first trained exclusively on Task A using standard cross-entropy loss and Adam optimization. Performance is evaluated on Task A using a held-out test set. Following this, the model is trained on Task B without revisiting Task A, and evaluation is repeated on both tasks.

import torch
import torch.nn as nn
import torch.nn.functional as F
class MLP(nn.Module):
def init(self):
super().init()
self.fc1 = nn.Linear(784, 256)
self.fc2 = nn.Linear(256, 256)def forward(self, x):
    x = x.view(x.size(0), -1)
    x = F.relu(self.fc1(x))
    x = F.relu(self.fc2(x))
    return self.out(x)

As expected, the model exhibits catastrophic forgetting: accuracy on Task A degrades significantly after Task B training, despite the underlying model architecture remaining unchanged. This result validates the conventional understanding that deep networks, when trained naively on non-overlapping tasks, tend to fully overwrite internal representations. To counteract this, we implement Elastic Weight Consolidation, which penalizes updates to parameters deemed important for previously learned tasks.

def compute_fisher(model, dataloader):
model.eval()
fisher = {n: torch.zeros_like(p) for n, p in model.named_parameters() if p.requires_grad}
for x, y in dataloader:
x, y = x.to(device), y.to(device)
model.zero_grad()
out = model(x)
loss = F.cross_entropy(out, y)
loss.backward()
for n, p in model.named_parameters():
if p.grad is not None:
fisher[n] += p.grad.data.pow(2)
for n in fisher:
fisher[n] /= len(dataloader)
return fis

To apply EWC, we compute the Fisher Information Matrix for the model parameters after Task A training. This is done by accumulating the squared gradients of the loss with respect to each parameter, averaged over samples from Task A. The Fisher matrix serves as a proxy for parameter importance—those parameters with large entries are assumed to play a critical role in preserving Task A performance. When training on Task B, an additional term is added to the loss function that penalizes the squared deviation of each parameter from its Task A value, weighted by the corresponding Fisher value. This constrains the optimizer to adjust the model in a way that minimally disrupts the structure needed for the first task.

Empirical evaluation demonstrates that with EWC, the model retains significantly more performance on Task A while still acquiring Task B effectively. Without EWC, Task A accuracy drops from 94 percent to under 50 percent. With EWC, Task A accuracy remains above 88 percent, while Task B accuracy only slightly decreases compared to the unconstrained case. The exact tradeoff can be tuned using the lambda regularization hyperparameter in the EWC loss.

This experiment highlights both the limitations and the flexibility of gradient-based learning in sequential settings. While deep neural networks do not inherently preserve older knowledge, PyTorch provides the low-level control necessary to implement constraint-aware training procedures like EWC. These mechanisms approximate the role of biological consolidation processes observed in the human brain and provide a path forward for building agents that learn continuously over time.

Future directions could include applying generative replay, using dynamic architectures that grow with tasks, or experimenting with online Fisher matrix approximations to scale to longer task sequences. While Elastic Weight Consolidation is only one tool in the broader field of continual learning, it serves as a useful reference implementation for those investigating ways to mitigate the brittleness of static deep learning pipelines.

Why the hell does this matter? beyond classification accuracy and standard benchmarks, the structure of learning itself remains an open frontier—one where tools like PyTorch allow morons and nerds like me to probe and control the dynamics of plasticity and stability in artificial systems.

Vibe Coding: The Art of Setting Money on Fire While Smiling

Look at this. Just look at it. This is what happens when you let people “vibe” their way through coding instead of learning how computers actually work.

What the Hell is Vibe Coding?

Vibe coding is the latest plague infesting our industry—a mindset where developers treat programming like some kind of abstract art form, where “feeling” the code is more important than understanding it. These people don’t optimize, they don’t measure, and they sure as hell don’t care about the consequences of their half-baked, duct-taped-together monstrosities.

Instead of learning how databases work, they just throw more RAM at it. Instead of profiling their garbage code, they scale horizontally until their cloud bill looks like the GDP of a small nation. And when things inevitably explode? They shrug and say, “It worked on my machine!” before hopping onto Twitter to post about how “coding is all about vibes.”

Vibe Coders Are Why Your Startup Burned Through $1M in Cloud Costs

The screenshot above isn’t fake. It’s not exaggerated. It’s the direct result of some “senior engineer” who thought they could just vibe their way through architecture decisions.

  • “Why use a cache when we can just query the database 10,000 times per second?”
  • “Who needs indexes? Just throw more replicas at it!”
  • “Let’s deploy this unoptimized Docker container to Kubernetes because it’s ✨scalable✨!”

And then—surprise!—the bill arrives, and suddenly, the CTO is having a panic attack while the vibe coder is tweeting about how “the cloud is just too expensive, man” instead of admitting they have no idea what they’re doing.

The Cult of Ignorance

Somewhere along the way, programming became less about engineering and more about aesthetic. People treat coding like a personality trait rather than a skill. They’d rather:

  • Spend hours tweaking their VS Code theme than learning how their HTTP server actually handles requests.
  • Write 17 layers of unnecessary abstraction because “clean code” told them to.
  • Deploy serverless functions for every single if-statement because “it’s scalable, bro.”

And the worst part? They’re proud of this. They’ll post their over-engineered, inefficient mess on LinkedIn like it’s something to admire. They’ll call themselves “10x engineers” while their entire app collapses under 50 users because they never bothered to learn what a damn database transaction is.

Real Engineering > Vibes

Here’s a radical idea: Learn how things work before you build them.

The next time you’re about to cargo-cult some garbage architecture you saw on a Medium post, ask yourself: Do I actually understand this? If the answer is no, step away from the keyboard and pick up a damn book.

Because vibes won’t save you when your production database is on fire.

Who Designed This? A Deep Dive Into Ping Federate’s Maze of Misery

You ever stare at an “Access Token Invalid” error for 3 hours, only to realize the JWT claim wasn’t missing — it just wasn’t included in the default Ping policy unless you sacrificed a chicken under a full moon?

Because I have.

I’ve just come out the other side of integrating PingFederate + PingAuthorize to issue EC-signed JWTs for Snowflake OAuth client credentials flow.

It took me:

  • 30+ screenshots
  • 6 document versions
  • 3 complete rebuilds of policy trees
  • and a signed token that still somehow didn’t include scp despite explicitly defining it 5 different ways

What Should’ve Taken 2 Hours Took 2 Days

Let me be brutally clear: setting up Client Credentials Flow should not feel like doing a doctoral thesis in Authorization XML. But with Ping? It’s like wrestling a snake made of drop-down menus and hidden dependencies.

Here’s what I went through:

  • Infinite policy recursion: I evaluated the same policy from 4 layers deep and still got an empty access token.
  • No defaults, no fallbacks: If you forget to bind your attribute to a resolver and then call it from a tree, inside a statement, inside a scope condition, congrats — the token will just ignore you.
  • ES256 Signing? Cool. But what if the JWKS URI suddenly returns nothing unless the key is active AND marked default AND exposed? Hope you like toggling checkboxes in four different tabs with no warning.

PingFederate UX Is an Escape Room

Every screen is a trap:

  • The UI is inconsistent.
  • Labels don’t match docs.
  • You have to click into “Details” > “Modify” > “Advanced” just to find basic claim injection logic.

God forbid you want to include both sub and upn. Because unless you build a nested policy that resolves scopes, checks the client ID, and custom-serializes each claim into a payload block, you’re going to get a token with exactly one thing: a timestamp and your broken dreams.

The Best Part?

I finally got a working token. I decoded it, tears in my eyes. The payload was correct. It passed into Snowflake. But I didn’t feel proud. I felt robbed.

Robbed of a week of work.
Robbed of all the time I spent trying to extract logic from screenshots like they were cave paintings.
Robbed by a system that could be great, but fights you every single step of the way.

Here’s What I Learned (So You Don’t Suffer Like I Did)

  1. Never trust the UI. Export XML and grep it like you’re in 2003.
  2. Manually test token scopes using curl and JWT decode — trust nothing inside Ping.
  3. Document everything. Because next week, your working token will stop working, and no one knows why.
  4. Sign your own tokens with your own key and validate the claims manually. Because relying on Ping to do what it says it will do is like hiring a mime to narrate your audiobook.

I Have No Idea What ‘Mentor’ Means Anymore

I’m honored to be mentoring 14 people across three global communities and also advising four stealth startups. Empowering the next generation of builders!

What the fuck does that even mean?

Did you hop on a Zoom call with someone once and tell them to “just believe in yourself”? Did you send a link to an outdated Medium post and call it career coaching? Or—my personal favorite—did you tell a junior engineer to “Google it” and then slap Mentorship Experience on your resume?

Everyone’s a mentor now. A coach. A keynote speaker. A guiding light. A North Star. A personal branding consultant. A Web3 philosopher.

Meanwhile, when actual work needs to get done, half these “mentors” are ghosting Slack, failing PR reviews, or posting motivational quotes about “grit” while someone else is cleaning up their Jenkins pipeline.

Let me break something to you gently:
You don’t have a brand. You have a job.

Somewhere along the way, the tech industry convinced itself that every human being is a startup. You’re not a person anymore—you’re a “personal brand,” a “founder of your own narrative,” a “content engine.” The obsession with branding yourself is turning people into walking LinkedIn carousels with zero self-awareness and even less actual value.

Here’s a fun fact: no one has ever asked me about my “brand.”
Not once.
No job interview. No client. No partner. No vendor.
Not one person has said, “Hey Peter, I was really moved by the synergy of your banner image and your title font. Tell me more.”

They ask what I’ve done. What I can fix. How I deal with hard problems. Not how I “position myself” as a “servant-leader technologist who thrives in ambiguity.”

How the fuck did we get here?

I miss when people just did things. Quietly. Without a 17-part LinkedIn post chronicling their “growth journey.” Without turning every pull request into a TED Talk. Without turning every coffee chat into a personal branding opportunity.

Kernel Chronicles: Syscalls, Shenanigans, and Lessons Learned

I was sitting in the office today talking about syscalls, that made me want to type a lot about it, so….here goes

Do you want to explore the intricacies of Linux kernel syscalls through real-world debugging tales, highlighting unexpected behaviors and valuable lessons for developers navigating kernel space. Me neither, but lets do it anyway

Ever felt like your syscall was swallowed by the kernel abyss? Venturing into kernel development often leads to such enigmatic experiences. This post delves into the world of syscalls, sharing humorous anecdotes and hard-earned lessons from the trenches of kernel debugging.

Understanding Syscalls

System calls, or syscalls, serve as the bridge between user space and kernel space, allowing applications to request services from the operating system. Think of it as a child asking a parent for scissors—accessing something potentially dangerous requires a formal request.

In Linux, syscalls are typically invoked via software interrupts or specific CPU instructions, transitioning control from user space to kernel space. This mechanism ensures controlled access to critical system resources.

Funny Syscall Quirks

The Case of the Disappearing File Descriptor

While implementing a custom syscall, I encountered a perplexing issue: file descriptors would mysteriously vanish. After hours of debugging, I realized I had forgotten to increment the reference count, leading to premature deallocation. A classic rookie mistake!

The Infinite Loop of Doom

In another instance, a misplaced condition check resulted in a syscall entering an infinite loop. The system became unresponsive, and I had to perform a hard reboot. Lesson learned: always validate your exit conditions.

Misinterpreted Return Values

I once misread a syscall’s return value, treating a negative error code as a valid result. This oversight led to cascading failures in the application. Proper error handling is crucial to prevent such mishaps.(Medium)

Lessons Learned and the PAINFUL STUFF

  • Incorrectly Replicating OS Semantics: When intercepting syscalls, ensure that the behavior remains consistent with the original OS semantics to avoid unexpected side effects.
  • Overlooking Indirect Paths: Be mindful of indirect resource accesses, such as symbolic links or file descriptors passed between processes, which can bypass your syscall interposition logic.(cs155.stanford.edu)
  • Race Conditions: Implement proper synchronization mechanisms to prevent race conditions, especially when dealing with shared resources.

Best Practices

  • Thorough Testing: Test syscalls under various scenarios to uncover edge cases and ensure robustness.
  • Comprehensive Logging: Implement detailed logging within syscalls to aid in debugging and performance analysis.
  • Code Reviews: Regularly conduct code reviews with peers to catch potential issues early in the development cycle.

Advanced Debugging Techniques

Utilizing strace

strace is an invaluable tool for monitoring syscalls made by a process. It provides insights into the sequence of syscalls, their arguments, and return values, aiding in pinpointing issues.

Leveraging perf

perf allows for performance profiling and tracing of syscalls. It helps identify bottlenecks and optimize syscall implementations for better efficiency.

Exploring bpftrace

bpftrace enables dynamic tracing of kernel functions, including syscalls. It offers a powerful scripting language to write custom probes for in-depth analysis.

Navigating the realm of kernel syscalls is both challenging and rewarding. While the journey is fraught with pitfalls and perplexities, each obstacle overcome adds to your expertise. Embrace the quirks, learn from the lessons, and continue exploring the depths of kernel developments